Showing posts with label Tutorials. Show all posts

Tuesday, January 10, 2012

Easy Make-up Bag Tutorial

This is not my idea.  I saw this on another site awhile ago and decided to try one on my own.
Supplies:  2- 11" x 17" pieces of fabric
2-11" x 17" vinyl iron on laminate (only one if you only want to laminate inside)
2- 1" x 2" pieces of fabric
Thread
9 inch zipper

Directions:
Iron on laminate according to directions to each of the 11 x 17 pieces.
Cut the two laminated pieces in half (11x8.5")

Sew one 1x2" strip right side facing to one end of the zipper.  Repeat. Than flip out pieces.

Align zipper right side facing down to the right side of the long edge of one of the outside pieces of the make-up bag.  Trim each end of the zipper/1"x2" fabric extensions to match the width of fabric.

Sew the zipper side to the fabric.

Right-sides together align the part you just sewed to the right side of one piece of the lining.

Sew the pieces together along the same seam line.

Your sewn pieces should look like this...

Attach the other side in the same manner.


Fold it open... and then unzip the zipper.
Align the right sides together of the outside, and also align the right sides together of the lining.

 Sew around the parameter leaving an opening in the lining to turn the bag right sides out.

To square off the bottom pull out the pieces so that you can align the horizontal seam to the vertical seam and then draw a line a couple inches from corner for each corner.
Sew on the lines and trim the excess.
Turn it all inside out and enjoy!

Friday, July 1, 2011

Quilter's Ironing Pad Tutorial

I finally got fed up with having to pull out the big old ironing board everytime I wanted to flatten out a seem... so I decided to create a smaller ironing pad that I could unfold onto any table or work surface.


Materials you will need:
  • 1/2 yard of Therma Flex (ironing board material) this is generous but necessar to get the right shape for the pad... you'll probably have enough for two ironing pads and more. I found mine at Hancock fabrics and paid about 4-5 dollars
  • 16 charm squares or 16- 5" squares of fabric
  • 1/8 yard of fabric for the binding
  • 1/2 yard of thermal batting or other quilt batting that is heat resistant.  I found mine by the therma flex material and it was appx. 2-3 dollars
  • Pins and Thread
**Use a 1/4 inch seam**
1.  Take two squares and line them up with right sides together.  Sew together with a 1/4 inch seam on one side.  Repeat until you have 8 sets of two squares. 

2.  Open up each set of two and iron seams open.
3.  with right sides together sew two sets together to make a row of four squares.

4.  Press open seams.  With right sides together sew one set of four squares to another set of four squares.
5.  Press open seams and then with right sides together sew one set of 8 to the other set of 8 to complete your back of the ironing pad.  Press open seams.
6.  Cut a piece of ironing fabric/Thermal Fabric to match the size of the back you just made.
7.  Cut a piece of the batting to match the back as well.
8.  With the wrong side of the back facing up, place the batting on top of it.  Be careful to lign up the edges.  Then place the thermal fabric on top, right side facing up, and line up all edges and pin.
9.  Sew the entire perimiter of the new stack with a 1/4 inch seam allowance.
10.  Add a binding using the binding tutorial.
Presto--- You are done :)

Binding Tutorial

I use to struggle with the binding part of quilting... but I seem to have a lot of luck with this one.
1.  Cut 2 1/2" inch strips of your binding fabric until you have enough to make it around your quilt plus several inches (about a foot) extra.
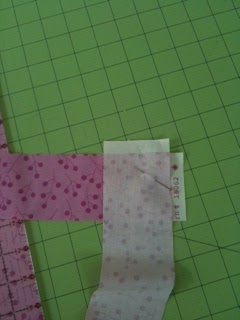
2.  Align the ends of the strips right sides together to form a L shape like below.  Pin in place. Sew them together from the top-left to the bottom right (diagonal).Open the strip up... you should now have one long contiuous strip.  Trim the excess and press the seem open.
 3.  fold the strip in half and press.
 4.  Open up one end of the strip and fold down the corner to make a 45 degree fold and press.
 5.  Refold the strip in half. Your end should look like below.
 6.  On one side of your quilt about 1/3 from the top pin down the the binding like below.
 7.  With a 1/4 inch seem allowance start sewing the binding about 3 inches from where the beginning of the strip is pinned down... This will leave the top unattached so that you can combine it with the end later on.
 8.  When you get to the corner stop about 1/4 inch from the edge.  Then life your presser foot and turn your project so that you can make a straight line to the corner.  Your corner should look like this:
 9.  fold the unsewn part of the binding to make a 45 degree angle.


 10.  fold the binding back over the 45 degree angle like below and pin in place.  Then sew from the edge (bottom right of picture)on down the new side with a 1/4" seem allowance.
 11.  when you get back to the beginning adjust the end so that it is inside of the beginning part of the binding that you left unsewn.
 12.  Now with the end tucked into the beginning continue sewing until you've gone over the begining sew line. Secure your stitches and remove from the sewing machine.
 13.  No flip your quilt over and pin the binding over the raw edge and onto the back of your project like below.
 14.  when you get to the corner it should naturally make an angle on the edge.. .finger press this angle down and then pull the next side over the raw edge to form a mitter edge.  Continue pinning in place.


15.  When you are finished pining, either hand stich the back of the binding with a slip stich or sew it on your machine.