Saturday, April 28, 2012
Saturday, April 21, 2012
Monday, March 26, 2012
Thursday, March 8, 2012
Sneak peek
I had enough of the baby farm fabric left to make a second baby blanket. Do far I like this one better than the first one.
Thursday, March 1, 2012
Thursday, February 23, 2012
Sunday, February 19, 2012
Saturday, February 18, 2012
Sunday, February 12, 2012
Saturday, February 11, 2012
Another baby quilt
In the process of cleaning out my stash I came across this unfinished quilt top. Funny how just an hour of my time I was able to finish something that I started 10 months ago :)
Friday, February 10, 2012
Mug rug
I finally got around to making my own mug rug. And it felt pretty good to be able to make an entire quilting project in under and hour! If you need a quick quilting fix I highly recommend it.
Sunday, January 29, 2012
Moose Quilt
Supplies:
Main Zig Zag (repeated every other zag) about 2 yards, enough left over for binding.
Secondary Zig Zag, 4- ½ yard pieces of coordinating fabric
½ for border
2.5 Yards for the back
Throw size batting
Step One: Cut 1.5 yard of main zig fabric in 3” strips the width of the fabric (I left mind folded then folded it again because I’m lazy, and then cut that way), then cut 3” strips the same way from the 4 – ½ yard pieces
Step Two:
Line up your strips with the main fabric on top, one of the secondary strips next, then another one of the same secondary strips next, than another one of the main fabric strips for the bottom.
Step Three:
With right sides together Sew the top two strips together, and then the bottom two together using a ¼” seam allowance.
Step Four:
Press open. Sometimes I like to use my body to press. Repeat with the rest of the strips.
Step Five:
Cut each set of sewn strips in 5.5” squares.
Step Six:
Organize your squares to form the zig-zags. One set of the sewn strips will either be the top of a whole zag or the bottom.
Step Seven:
Get a friend to help you.
Step Eight:
Sew together in diagonal rows like pictured.
Don’t forget to press your seams open as you go. Again I am using the body press.
Step Nine:
Sew your diagonal rows together.
Step Ten:
Trim the sides so that it is a rectangle.
Step Eleven:
Cut your border (I used a 3 inch border) and sew it on.
Step Twelve:
Piece your back fabric to match the size of your front. Then put your back, batting, and quilt top together. Quilt, and then bind. Use the binding tutorial on my blog if you need help with that.
Saturday, January 28, 2012
Tuesday, January 10, 2012
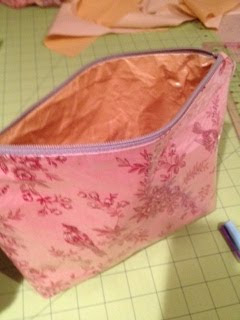
Easy Make-up Bag Tutorial
Supplies: 2- 11" x 17" pieces of fabric
2-11" x 17" vinyl iron on laminate (only one if you only want to laminate inside)
2- 1" x 2" pieces of fabric
Thread
9 inch zipper
Directions:
Iron on laminate according to directions to each of the 11 x 17 pieces.
Cut the two laminated pieces in half (11x8.5")

Sew one 1x2" strip right side facing to one end of the zipper. Repeat. Than flip out pieces.
Align zipper right side facing down to the right side of the long edge of one of the outside pieces of the make-up bag. Trim each end of the zipper/1"x2" fabric extensions to match the width of fabric.
Sew the zipper side to the fabric.

Right-sides together align the part you just sewed to the right side of one piece of the lining.

Sew the pieces together along the same seam line.

Your sewn pieces should look like this...
Sunday, January 8, 2012
Subscribe to:
Comments (Atom)


