I use to struggle with the binding part of quilting... but I seem to have a lot of luck with this one.
1. Cut 2 1/2" inch strips of your binding fabric until you have enough to make it around your quilt plus several inches (about a foot) extra.
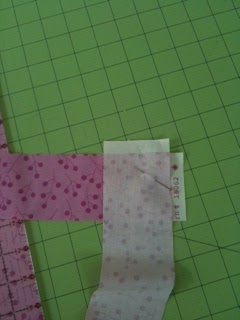
2. Align the ends of the strips right sides together to form a L shape like below. Pin in place. Sew them together from the top-left to the bottom right (diagonal).Open the strip up... you should now have one long contiuous strip. Trim the excess and press the seem open.
3. fold the strip in half and press.
4. Open up one end of the strip and fold down the corner to make a 45 degree fold and press.
5. Refold the strip in half. Your end should look like below.
6. On one side of your quilt about 1/3 from the top pin down the the binding like below.
7. With a 1/4 inch seem allowance start sewing the binding about 3 inches from where the beginning of the strip is pinned down... This will leave the top unattached so that you can combine it with the end later on.
8. When you get to the corner stop about 1/4 inch from the edge. Then life your presser foot and turn your project so that you can make a straight line to the corner. Your corner should look like this:
9. fold the unsewn part of the binding to make a 45 degree angle.
10. fold the binding back over the 45 degree angle like below and pin in place. Then sew from the edge (bottom right of picture)on down the new side with a 1/4" seem allowance.
11. when you get back to the beginning adjust the end so that it is inside of the beginning part of the binding that you left unsewn.
12. Now with the end tucked into the beginning continue sewing until you've gone over the begining sew line. Secure your stitches and remove from the sewing machine.
13. No flip your quilt over and pin the binding over the raw edge and onto the back of your project like below.
14. when you get to the corner it should naturally make an angle on the edge.. .finger press this angle down and then pull the next side over the raw edge to form a mitter edge. Continue pinning in place.
15. When you are finished pining, either hand stich the back of the binding with a slip stich or sew it on your machine.


I've never seen that strategy - looks incredibly easy!
ReplyDelete